INTRODUCTION
Gelatin hydrogels have attracted significant attention in the field of regenerative medicine, and more specifically, in their use as wound dressings and artificial tissue replacements. Among the different photo-crosslinkable gelatin materials, gelatin methacryloyl (GelMA) hydrogels display a series of advantages, such as good biocompatibility (including biosafety and biological functionality) and tunable physicochemical properties, making them a promising biomaterial for many bioprinting applications. Tunability of the physicochemical properties can be achieved by controlling the synthesis process: from the source of GelMA employed (origin, Mw, degree of substitution, initial macromere concentration, etc.) to the selection of the photoinitiator (type, concentration, etc.) and the conditions of the photo-crosslinking reaction (employed wavelength, irradiance, exposure time, etc.). These parameters are closely related to the elastic modulus, degradation rate, porosity, swelling capacity of the hydrogel, amongst others, which will in turn determine the overall functionality of the tissue-like construct.
This protocol describes the materials, equipment and the steps required for the preparation of GelMA-based bioinks and the biofabrication of fibroblast-laden GelMA scaffolds through 3D bioprinting.
MATERIALS
Reagents and consumables
- Human primary dermal fibroblasts (hDF)
- 0.25 g of lyophilized GelMA (ClaroTM BG800, PB Leiner, part of Tessenderlo Group nv)
- Lithium Phenyl(2,4,6-trimethylbenzoyl)phosphinate (LAP)
- 1X Phosphate buffered saline (1X PBS) with Ca2+/Mg2+
- Fibroblast growth media
- Trypsin/EDTA solution
- 5 cc bioprinting syringe
- 5 cc red adjustment piston
- 22G conical dispensing tip
- Snap end cap
- 0.22 µm pore size sterile polystyrene filter
- 5 cc sterile syringe
- 15 ml conical polypropylene tubes
- 50 ml conical polypropylene tubes
- T75 cell culture treated flask
- 100 mm diameter culture dishes
- Serological pipettes (5, 10 and 25 ml)
- Micropipette tips (1000, 200 and 20 µl)
- Live/DEAD Viability/Cytotoxicity kit
Equipment required
- REG4Life 3D bioprinter equipped with light curing module operating at 405 nm and refrigerated printhead and bed platform
- Laminar flow cabinet
- Thermostatic water bath
- P1000, P200 and P20 micropipettes
- Automatic pipetor
- Centrifuge
- Hemocytometer
- Optical microscope
- Cell culture incubator
- All-in-one inverted microscope
METHODS
The protocol needs to be performed under a sterile microenvironment (biosafety/ laminar flow cabinets) using sterile reagents and consumables to guarantee the absence of bacterial and fungi contaminants.
- Preparation of GelMA hydrogels
- Set thermostatic water bath temperature to 45ºC
- Add 4 ml of pre-warmed 1X PBS to a vial containing 0.25 g of lyophilized GelMA (ClaroTM BG800, PB Leiner, part of Tessenderlo Group nv)
- Add 0.5 ml of 1% (w/v) LAP solution in 1X PBS (w/v)
- Leave the vial dissolving at 45ºC in the water bath for approx. 1 h or until properly dissolved
- Cool down the solution to 37ºC prior to its mixture with cells
- Preparation of the hDF-GelMA bioink
- Transfer 4.5 ml of the GelMA hydrogel into a 15 ml conical tube using a P1000 micropipette.
- Harvest hDFs and count them
- Add 0.5 ml of cell suspension containing 1.25 x 10⁶ hDFs/ml into the GelMA solution using a P1000 micropipette
- Mix carefully up & down with the micropipette until observing a homogeneous solution, avoiding bubble formation
- Transfer the bioink to a 3D bioprinting syringe:
- Connect an amber 5 cc bioprinting syringe barrel to a snap end cap
- Transfer the entire volume of the bioink (5 ml) to the syringe
- Adjust a 5 cc red piston
- Connect the plunger to the red piston
- Turn the syringe upside down
- Remove the snap end cap and push plunger in to eliminate air
- 3D bioprinting of fibroblast-laden GelMA scaffold
- Switch on the laminar flow cabinet and proceed with the sterilization of the 3D bioprinter under UV-C for 30 min
- After that time, turn on the refrigeration system for operating at the desired printing temperature (16ºC), both at the printhead and at the printing platform levels
- Insert the syringe containing the bioink in the designated space of the refrigerated printhead and cool the bioink down to 16ºC
- Replace the snap on end cap from the syringe by a sterile 22G ID conical dispensing tip
- Turn on the REG4Life bioprinter and launch the REGEMAT 3D Designer Software
- Specify the configuration of the printheads in “Header Configuration” and proceed with the laser calibration of the visible light curing module operating at 405 nm and of the refrigerated syringe, thus ensuring the correct positioning of the tools with respect to the printing platform. Do this step always on the glass bed platform
- Remove the glass bed, insert a precooled petri dish into its adaptor, select the diameter (100 mm) in “Printing Platform” and then secure it to the bed platform by screwing. Adjust the distance between the tip of the syringe and the surface of the printing bed to approx. 30 mm by clicking “Header Configuration” and “Fine Calibration”
- The system in now ready for the 3D bioprinting of cell-laden scaffolds
RESULTS
The following bioprinting parameters have been optimized for generating porous cylindrical hDF-laden scaffolds with high resolution and shape fidelity, securing high cell viability after the bioprinting process.
Object configuration


Extra configuration

Printable object

*Please note that light intensity and curing speed can be adjusted in order to produce softer or stiffer 3D constructs (the higher the dosage in terms of irradiance and time exposure, the stiffer the hydrogel).
Cell-laden scaffolds are stabilized at RT without the addition of culture media for 30 min. Then, 10 ml of fibroblast culture media are added and petri dishes are left in a standard incubator for cell cultures (5% CO2, 37ºC).
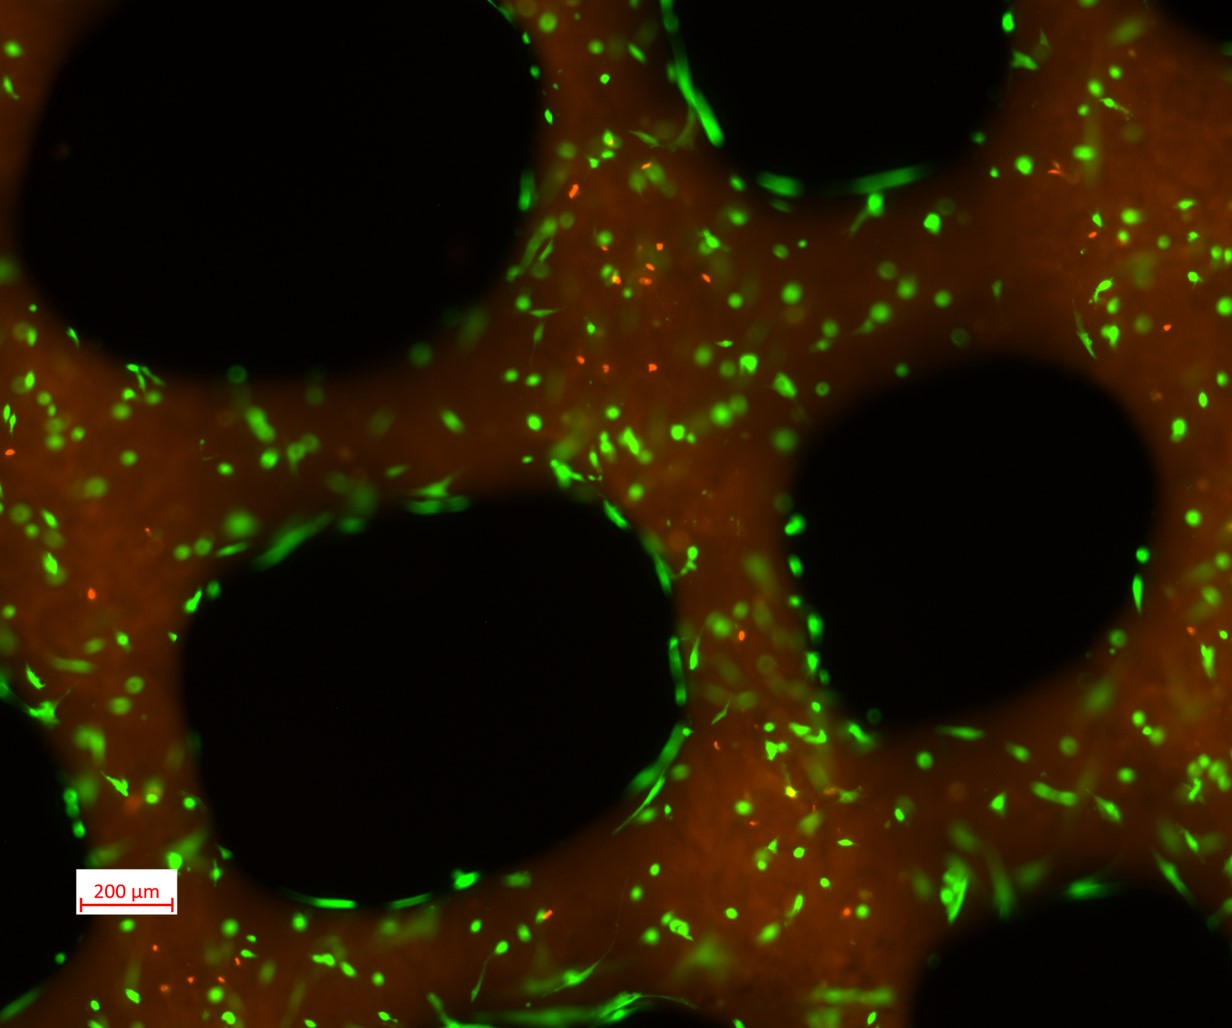
Cell viability
hDF display high survival and typical morphologies within the scaffolds one week after bioprinting. Images were acquired with an epifluorescence microscope (ZEISS Axiovert 5). Detailed protocol for Live/Dead staining for visualizing live cells in green (stained with calcein) and dead cells in red (labelled with with ethidium homodimer-I) can be found in the labmethod “Scaffold biocompatibility assessment”.
| Number | Category | Product | Amount |
|---|