INTRODUCTION
EASYGEL INX© X100 is a gelatin-based, shear thinning, cell-interactive, extracellular matrix (ECM)-mimicking ink. It provides all the benefits of gelatin with the asset of an unique shear thinning behaviour which, in contrast with many gelatin formulations, allows easy printing at 37 °C. Based on gelatin derived from natural collagen, EASYGEL INX© X100 has been modified with photo-crosslinkable functional groups which, in combination with its excellent 3D printing behaviour, allow for great shape fidelity and construct handleability after printing. Its natural origins and ECM resemblance allow for exceptionally high cell viabilities. Accordingly, EASYGEL INX© X100 has been used to generate and sustain 3D cellular structures of a variety of human tissues, including adipose derived stem cells, and human foreskin fibroblasts.

Figure 1. (a) Flow curve of EASYGEL INX© as a function of shear rate. (b) Storage and loss modulus of EASYGEL INX© tested via step strain tests. (c) Storage and loss moduli of EASYGEL INX© recorded via rheometer during UV irradiation.
MATERIALS
- EASYGEL INX© X100 (3 cc) (BIOINX©)
- 0.41 mm inner diameter polypropylene dispensing tips (sterile)
- 100 mm diameter petri dishes (sterile)
EQUIPMENT
- REG4Life 3D Bioprinter (REGEMAT3D S.L.)
- UV-light (365 nm) photocuring system (REGEMAT3D S.L.)
- 100 class biological cabinet (REGEMAT3D S.L.)
- Petri dish adapter for the REG4Life 3D Bioprinter (REGEMAT3D S.L.)
- Fine forceps (sterile)
METHODS
Calibration of the Reg4Life 3D Bioprinting system
In the main window of the REGEMAT3D R4L Designer software, after connecting the 3D bioprinter to the software, press Settings > Header configuration. A pop-up window will appear displaying the different printheads that can be incorporated into the device and its positioning within the device.
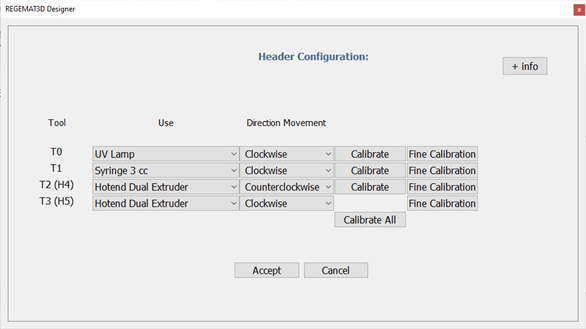
From each dropdown menu, the corresponding tools positioned in each printhead allocation of the device can be selected. Ensure that “UV Lamp” is selected for T0 and “Syringe 3cc” is selected at T1. Once the proper printheads are selected, the calibration cap is attached to the photocuring tool, and the EASYGEL INX© X100 cartridge with the corresponding tip is loaded in T1, click the “Calibrate” button sequentially for every printhead, starting from T0 onwards. Once the “Calibration completed” message pops-up, the calibration of the corresponding tool has successfully finished. Press “OK” and continue with the calibration of the following tool. Once all the tools have been successfully calibrated following the abovementioned procedure, press “Accept” and “OK” afterwards in order to save the calibration parameters.
NOTE: Calibration should always be performed using the glass bed as printing platform.
After calibration, replace the glass bed with the Petri dish adapter from the printing platform and load a 100 mm diameter sterile Petri dish onto the adapter to continue with the fine calibration procedure. In the main window of the REGEMAT3D R4L Designer software, press Settings > Platform configuration, and select “Petri dish” in the pop-up window. Set the diameter value to 99,99 and press “OK”. Followingly, in the main window of the REGEMAT3D R4L Designer software, press Settings > Header configuration. In the pop-up window, ensure that “Syringe 3cc” is selected at T1. Press the “Fine Calibration” button for T1. A pop-up window will appear for the fine calibration of the height of the nozzle from the printing bed. Adjust the value in order to have a distance from the printing bed of 0.25 mm. This can be performed by lowering the tip of the nozzle until the petri dish, and subtracting 0.25 mm from that coordinate value. Once adjusted, press “Accept” and save the calibration parameters as for the general calibration of the printheads. For the photocuring system, the initial calibration automatically sets the height of the tool at 2 cm from the printing surface, which corresponds to an irradiation value of 20 mW/cm2.
All the abovementioned procedures should be performed under sterile conditions and following aseptic technique. For further details, please refer to REG4Life working protocol inside a biological cabinet.
Configuration of the Reg4Life 3D Bioprinter for printing EASYGEL INX© 3D scaffolds
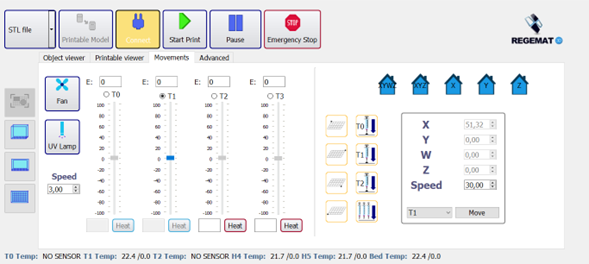
Once configured the printing bed and performed the fine calibration, press Settings > Extra configuration. A pop-up window will appear allowing to configurate a number of parameters of the printer. Ensure that the parameters are set as depicted in the following window, and press the “Accept” button:

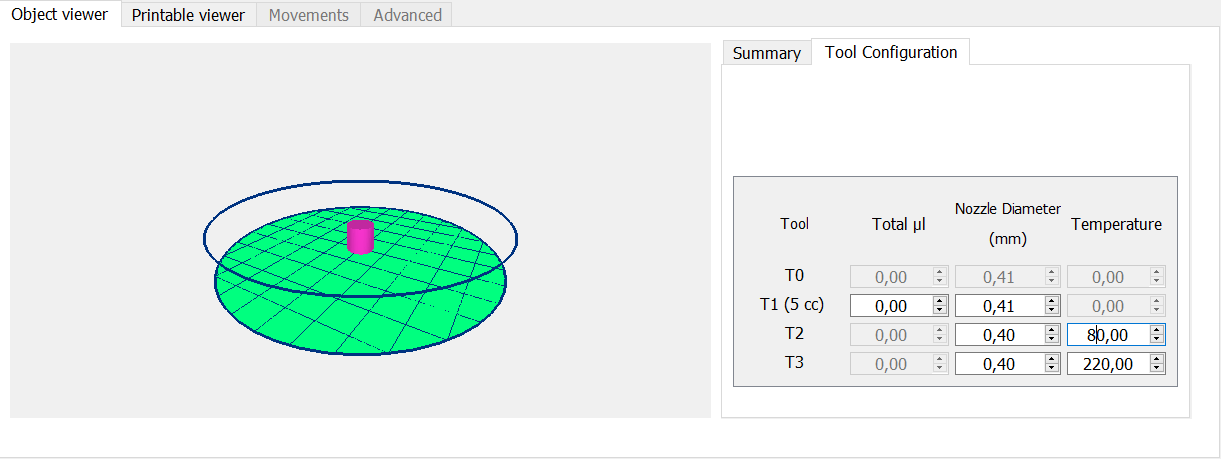
Next, in the main window of the REGEMAT3D R4L Designer software, select the “Object viewer” tab, and in the “Tool configuration” tab, for the T1 tool, set the nozzle diameter to 0,41 mm. Press the STL file button of the main window, and select cylinder from the dropdown menu. A cylindrical object will appear in the object viewer tab.
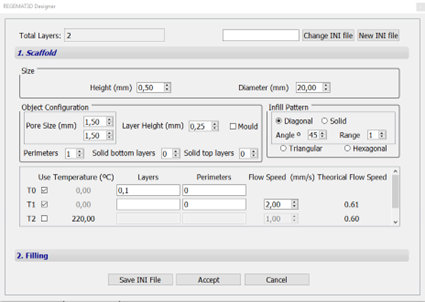
Double-click the loaded object, and from the dropdown menu, select configuration. A menu will pop-up allowing to configure the object to be printed. Set the parameters as displayed in the following window and press “Accept”:
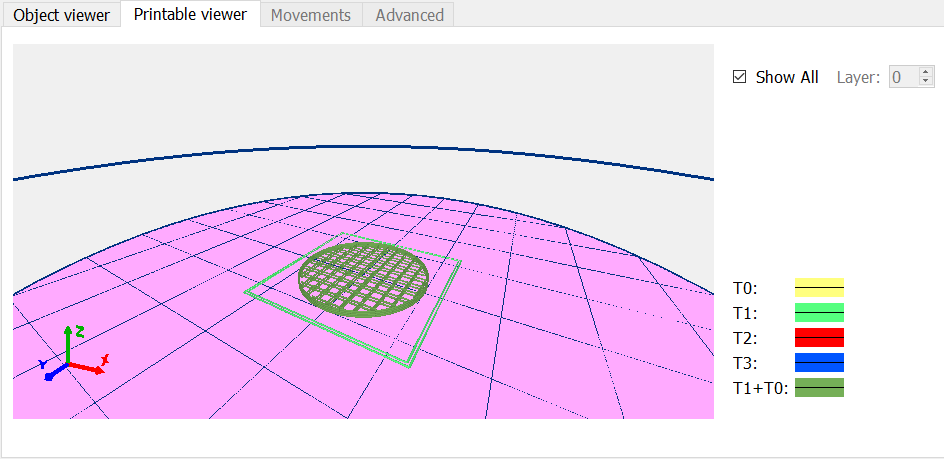
Back in the main window of the REGEMAT3D R4L Designer software, press the “Printable model” button to generate the printable object with the configured characteristics. The “Printable Viewer” tab of the software will be automatically selected, displaying the printable model of the object generated by the software, and allowing to navigate through the model and examine the different layers to be printed.
In the movements tab of the main window of the REGEMAT3D R4L Designer software, press the home button, and after having loaded the syringe with the appropriate tip, select T1 and move the corresponding slide-bar upwards in order to remove the air contained in the nozzle tip. Once the material starts flowing through the tip and a continuous filament is extruded from the nozzle, remove the excess of extruded material, and press the “Start Print” button in order to launch the 3D printing process.
RESULTS
Following the abovementioned protocol, EASYGEL INX© cylindrical scaffolds of 20 mm diameter, 0.5 mm height and 1.5 mm pore size will be 3D printed and photocrosslinked using the REG4Life 3D Bioprinter (REGEMAT3D S.L.) under aseptic conditions. The scaffolds can be lifted from the Petri dish and further allocated into the desired cell culture containers, in order to seed cells on top of them. Example applications are supporting the culture of adipose tissue-derived mesenchymal stem cells and human foreskin fibroblasts.
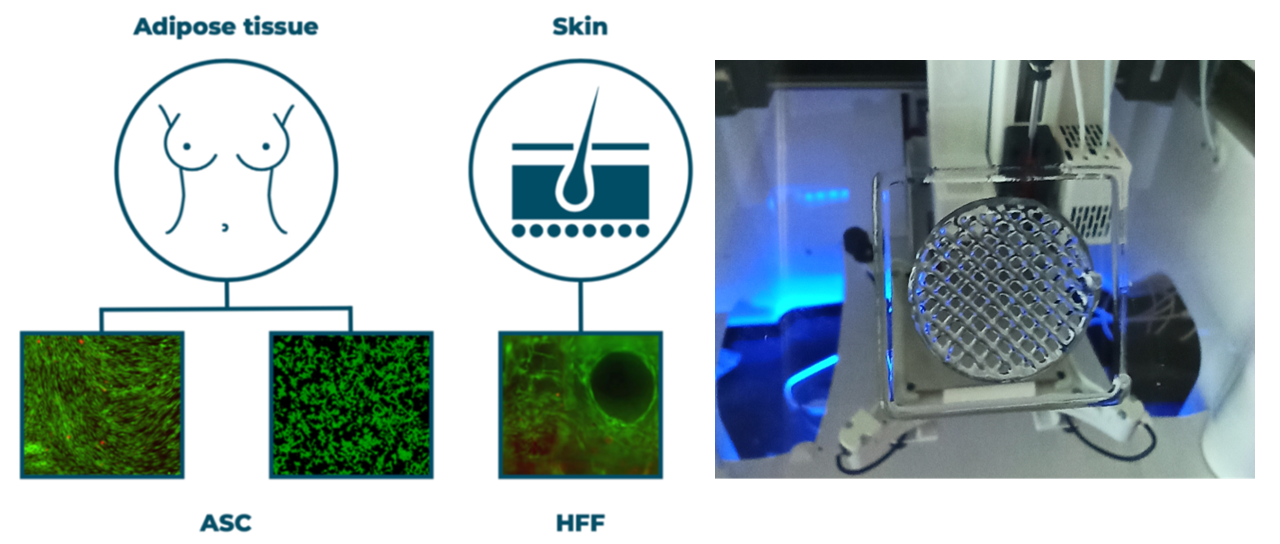 Figure 2. Potential applications for which the 3D printed scaffolds can be used (left). 3D printed scaffold (right) using STABLE INX© (BIOINX©) and the REG4Life 3D Bioprinter (REGEMAT3D S.L.).
| Number | Category | Product | Amount |
|---|