Introduction
Thermoplastic polyurethanes (TPU) are a category of materials broadly used for biomedical purposes thanks to their biocompatibility, elasticity and strength. Among the different manufacturing techniques, 3D printing technology has attracted significant attention for the production personalized TPU-based medical devices over the last decade. The preference of this technique over conventional manufacturing approaches such solvent casting or foaming relies on the superior control on scaffold architecture, pore network and pore size enabled by 3D printing.
This protocol describes the 3D printing of flexible and electroconductive TPU-based scaffolds and the subsequent surface activation by means of plasma treatment combined with poly-L-lysine coating for the culture of rat astrocytes. All the materials, reagents and equipment required are listed below.
Materials
Reagents and consumables
- Flexible and electroconductive thermoplastic polyurethane (TPU)-based filament
- Rat astrocytes from cerebral cortex
- Astrocyte culture medium
- Primary cells detach kit
- 1 mg/ml Poly-L-lysine solution (PLL)
- 1X Dulbecco’s phosphate buffered saline (1X PBS)
- Trypsin/EDTA solution
- Trypan blue solution
- 15 ml conical polypropylene tubes
- 5 ml microcentrifuge tubes
- 6 well plates for tissue culture
- 5 and 10 ml serological pipettes
- Micropipette tips (1000, 200, 20 and 10 µl)
- Live/Dead Viability/Cytotoxicity kit
Equipment required
- REG4Life 3D bioprinter equipped with a filament extruder with 0.8 mm nozzle diameter
- Biosafety cabinet
- Thermostatic water bath
- P1000, P200 and P20 micropipettes
- Automatic pipetor
- Centrifuge
- Hemocytometer
- Plasma cleaner
- Cell culture incubator
- Confocal microscope
Methods
The methodology is divided in six sections: 1) 3D printing of porous cubic scaffolds; 2) plasma surface activation; 3) sterilization; 4) coating with PLL; 5) cell seeding; 6) evaluation of cell viability.
- 3D printing of elastic, flexible, porous TPU-based scaffolds
- Turn on the REG4Life bioprinter, connect it to the PC and launch the REGEMAT 3D R4L Designer Software. Then click the “Connect” button.
- Specify the header configuration and calibrate the printhead to be used. To that end, press Settings > Header configuration and select the tool Hotend Dual Extruder in the corresponding printhead allocation (T2). Click calibration button and wait for the calibration to be completed. Afterwards, do a Fine Calibration by positioning the nozzle at a distance of 0.5 mm from the printing platform. Press “Accept” and then do a Homing by clicking the XYWZ button in the “Movements” tab.
- Configure the printing bed by pressing Settings > Platform configuration. Then select “Glass bed”, tick the temperature box and set the value to 60ºC. Press “Accept”.
- Open the side door of the printer, load the filament spool and secure with the spool holder. Insert the filament in the guide tube, heat the filament extruder by ticking T2 and selecting 250ºC in the “Movements” tab. Once heated to the target temperature, move the T2 slide-bar upwards in order to extrude a small amount of material.
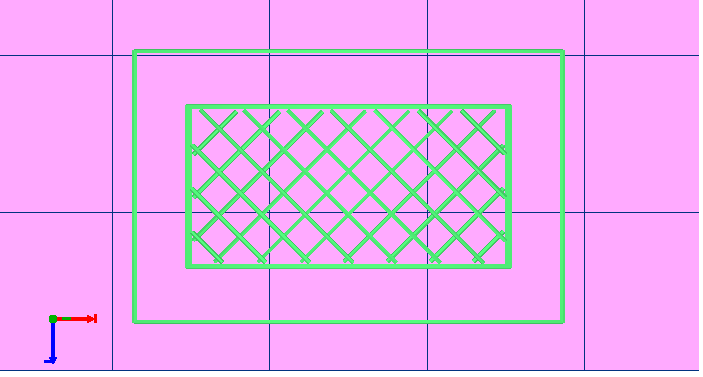
- Specify T2 nozzle diameter (0.8 mm) and temperature (250 ºC) in the “Tool configuration” section within the “Object viewer” tab. Then, load the .stl file to be printed. In this case, a cube with the following object configuration was used:
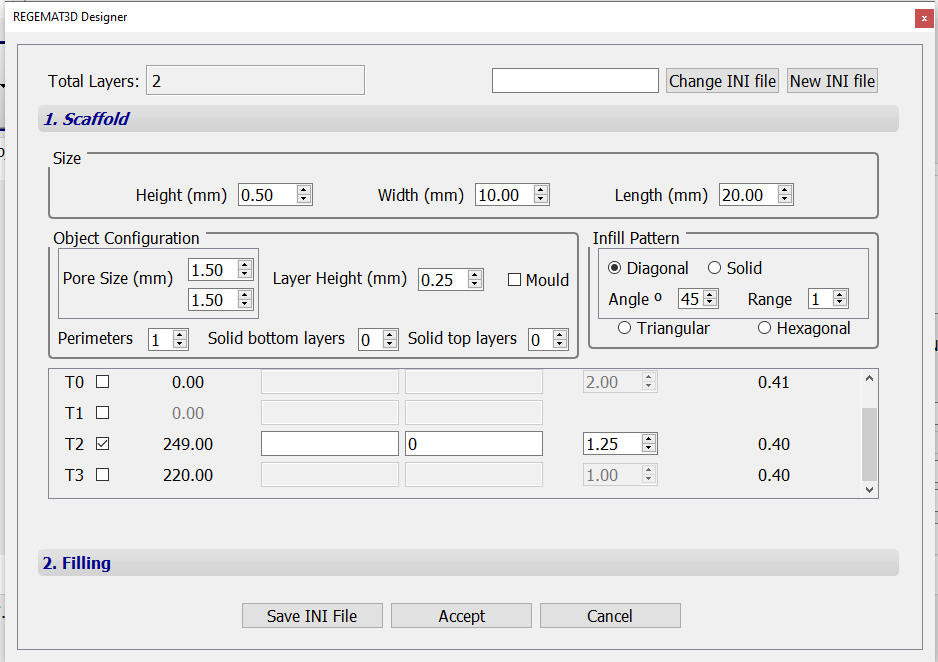
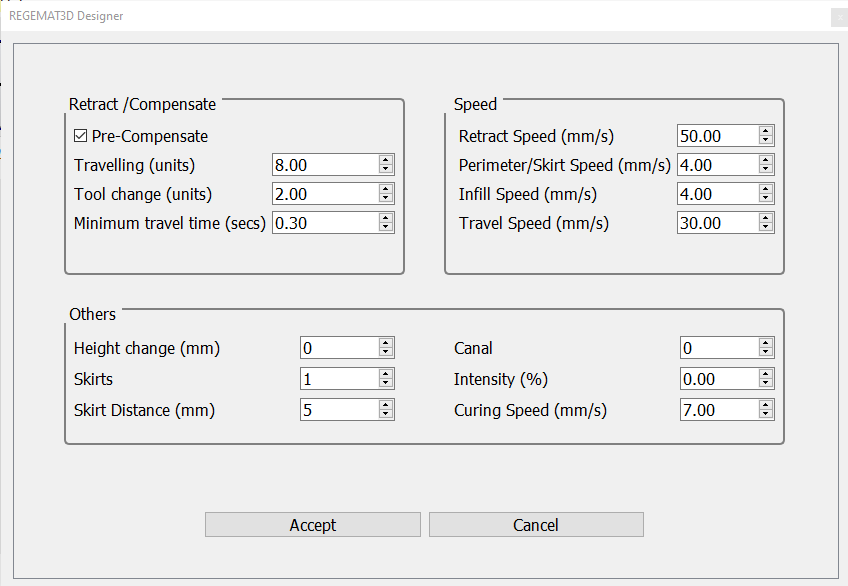
- The following printing parameters can be used in Settings > Extra configuration to produce scaffolds with the desired shape and resolution.
- Select “Printable Object” to generate the G-code and then clicking “Start Print button” for generating the scaffold.
- Let the scaffold cool down, remove it from the glass bed with tweezers and transfer it to a 100 mm diameter culture dish. Print as many scaffolds as required by repeating 1.7 and 1.8 steps.
- Activation of scaffolds with plasma treatment
- Place the culture dish containing the scaffolds inside a plasma cleaner
- Remove the lid of the culture dish
- Activate scaffolds’ surface by applying the highest power (18 W) for 60 sec
- Close the lid and proceed immediately with the next step
- Sterilization of scaffolds
- Transfer all the scaffolds into a 50 ml conical tube containing 70% ethanol and leave in agitation for 60 min
- Wash scaffolds in 1X PBS containing antibiotics (100 U/ml penicillin + 100 µg/ml streptomycin) and antimycotics (25 ng/ml amphotericin B) for 3 times (5 min each), dry them through aspiration, transfer them to a 60 mm diameter culture dish and proceed immediately with step 4
- Irradiate scaffolds under the UV lamp of the biosafety cabinet for 30 min
- PLL coating of the scaffolds
- Add PLL solution in autoclaved distilled water. The recommended coating concentration is 2 µg/cm2
- Leave incubating at 37ºC for 2 h
- Aspirate PLL solution and wash with autoclaved distilled water twice (5 min each)
- Leave scaffolds air drying for 5 min and proceed immediately with step 5.
- Cell culture on the scaffolds
- Harvest astrocytes cultured in a 75 cm2 surface flask: 1) aspirate astrocyte culture media; 2) wash with 10 ml of 1X PBS; 3) add 8 ml 1X PBS + trypsin/EDTA solution and leave reacting at 37ºC for 2 min; 4) neutralize solution with 10 ml of neutralizing solution and transfer cell suspension to a 50 ml conical tube; 5) centrifuge cells at 1,000 rpm for 5 min; 6) aspirate supernatant and resuspend pellet in culture media; 7) count cells
- Adjust astrocyte density at 1,250,000 cells/ml
- Transfer scaffolds to wells of a 6 well plate with the help of tweezers
- Add 80 µl of astrocyte cell suspension along the entire surface of the scaffold
- Leave scaffolds at 37ºC and 5%CO2 for 1 hour
- Add 2 ml of astrocyte complete media
- Determination of cell viability
- After 7 days of culture, rinse scaffolds twice in 1X PBS and then immerse them in Live/Dead staining solution consisting in 2 µM ethidium homodimer-I and 0.5 µM calcein in 1X PBS at 37ºC and 5% CO2 for 30 min
- After that time, wash scaffolds in 1X PBS (3 times) and proceed immediately to imaging in a epifluorescence or confocal microscope
NOTE: The detailed protocol for Live/Dead staining is described in the labmethod Scaffold biocompatibility assessment
Results
The 3D printing protocol optimized herein enables the fabrication of flexible and electrically conductive TPU-based scaffolds with the desired geometry and resolution (Fig. 1). Treatment with plasma increases the hydrophilicity of the scaffold improving PLL coating and subsequent cell attachment.

Fig. 1. Tension forces being applied to the scaffold using an electromechanical material testing machine.
Figure 2 illustrates Live/Dead staining of rat astrocytes cultured on PLL-coated porous scaffolds. Cells display high survival (green cells, stained with calcein) and typical morphologies at day 7 of culture, with minimal cell death (red nuclei, stained with ethidium homodimer-I).
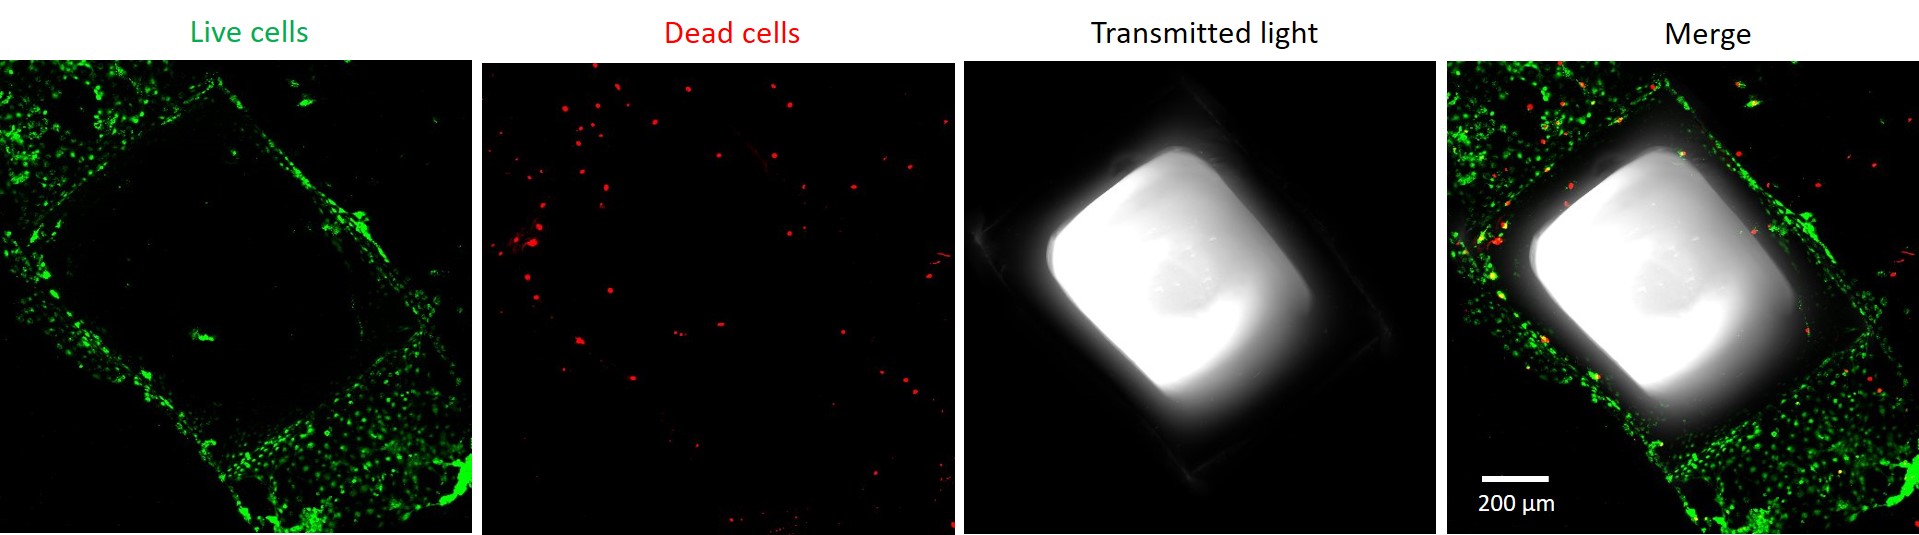
Figure 2. Representative confocal images depicting the high viability of rat astrocytes cultured on the surface of porous scaffolds.
Conclusion
In conclusion, the thermoplastic polyurethane (TPU)-based filament employed in this method enables the fabrication of flexible and electrically conductive scaffolds with a tremendous potential in the biomedical sector, especially for applications in musculoskeletal and neural tissue engineering. After the 3D printing of scaffolds, cells can be either directly seeded onto its surface, as it has been described in this method, or being embedded in a hydrogel that is injected into the pores using injection pore/volume filling techniques with REGEMAT 3D Design Software. Given the intrinsic properties of the material, the cell-laden scaffolds can be mechanically and electrically stimulated during post-printing process to promote cellular functions and tissue maturation.
| Number | Category | Product | Amount |
|---|
184 thoughts on “Culture of astrocytes on flexible and electrically conductive 3D printed scaffolds”