
INTRODUCTION
The cell aggregation is the combination of two cellular functions: cell-to-cell recognition and cell adhesion. In comparison with bidimensional (2D) cell culture, the three-dimensional (3D) cell aggregates provide functional microtissues that mimic the native tissue conditions of growth and adhesion. The aggregation can be done with cells from the same type or different types, allowing the generation of tissue-like microstructures in space and heterogeneity. The cell aggregates can be used in basic research, in tissue regeneration or in drug screening as clusters, spheroids, multicellular spheroids and organoids. In tissue regeneration strategies, the formation of those large multicellular constructs can be combined with the 3D Bioprinting to create complex and functional constructs.
The process of generating a cellular aggregate can be done via different methodologies: hanging-drop, non-adherent 96-well plate, hydrogel embedding and colony formation, among others. In terms of low-cost and effectiveness, the hanging-drop technique is the most appropriate, as the collection of a high bulk of spheroids can be done for other techniques, and the automatisation for generating the drops is easy.
An disadvantage of this technique is that the cells cannot grow longer than 3-4 days, as the medium will dry even with the humidity chamber. The small volume of medium used in the drops is limitant in nutrients. We can add fresh medium every 2-3 days, but this technique is limited to quickly aggregating cells or performing aggregates, not for long term experiments.
MATERIALS
- Primary Human Dermal Fibroblasts (HDF)
- Dulbeco’s Modified Eagle’s Medium (DMEM)
- Fetal Bovine Serum (FBS) (10%)
- Penicillin/Streptomycin (P/S) (1%)
- 10 mm or higher sterile petri dish plates
- Sterile PBS 1X
- Trypsin 1X
- Cell incubator at 5% CO2 and 37 ºC
METHODS
Cell suspension obtention: trypsinization
Prepare the reagents before starting the protocol. Prewarm the reagents (medium, FBS, P/S, PBS 1X, trypsin 1X) in a water bath at 37ºC for 15-20 minutes:
- Inside the biological cabinet, prepare the complete medium with DMEM supplemented with 1% P/S and 10% FBS.
- Aspirate the medium of the T75 flask carefully without touching the cells.
- Rinse with 37ºC prewarmed PBS 1X (8 ml) and aspirate the PBS 1X.
- Add 2 ml of prewarmed trypsin 1X and incubate 2-5 minutes at 37ºC minutes or until cells are completely rounded up (monitored with inverted microscope).
- Add 8 ml of medium containing FBS and collect the liquid in a conical tube of 15 ml for centrifuge at 1000 rpm and RT for 5 minutes.
- Aspirate the supernatant without disturbing the cell pellet.
- Resuspend the cells carefully with 1-2 ml of warm FCM (cell suspension) and a micropipette P1000. Count the cells with a Neubauer chamber.
Cell aggregates preparation: hanging-drop technique
- Prepare a solution in order to have 2,000 cells in 20 µl of solution for the HDF. The cell density of this solution should be 100,000 cells/ml.
- Add 1X sterile PBS to the bottom of a petri dish as a humanity chamber. For a 100 mm plate, a volume of 5 ml is enough to maintain the culture.
- Place 15-30 drops of 20 µl in the petri dish cover with enough separation (1 mm), or more drops if the plates are higher. In a square petri dish, we can add up to 60 drops, allowing a bigger amount of spheroids.
- Quickly, flip 180º the petri dish cover until we have our drops in suspension. If the drops are too close, they will move and mix, having an irregular drop with more cells that we should discard.
- Leave the plates on the incubator for 1-2 days until aggregate.
- Check under a microscope until seeing proper aggregates (figure 1). If the aggregates are not formed on day 3, you can add 5-10 µl of fresh medium.
NOTE: some modifications will be required in the cell number in each drop according to the cell type. Additionally, you can use a 0.1-0.6% methylcellulose solution in the medium, to create a more dense solution and add more volume in each drop (avoid drying in long experiments).
IMPORTANT: If the cell aggregates last several days, we might choose another technique available like non-adherent 96-well plates, as we work with higher volume inside each well.
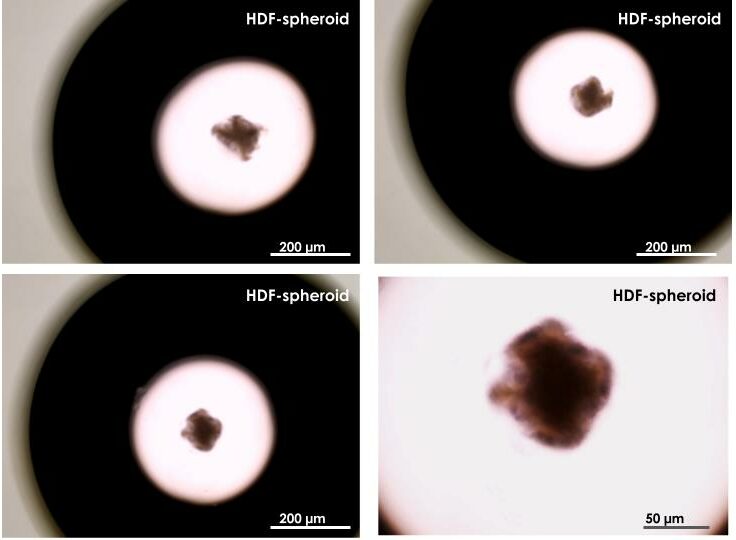
Figure 1. The generated spheroids can be visualized easily even without a lupe or inverted microscope. The spheroids in the pictures have 2,000 cells in each aggregate and have been growing for 2 days in vitro.
Spheroid collection from the hanging-drops
Collection of the spheroids can be modified according to the final use. If we want to embed manually the spheroids we can pick them with a micropipette P200-P10. In our case, we want to collect them for 3D bioprinting, so we will follow this protocol:
- Flip the cover of the petri dish plate facing up and add sterile PBS 1X with 20% FBS. Gently rock the medium around the plate to collect all the spheroids.
- Collect the medium and repeat the procedure to collect the remaining spheroids.
- Transfer all the liquid to a 50 mL falcon tube and centrifuge for 5 minutes at 200 rpm.
- Remove the supernatant and resuspend your spheroids with your biomaterial of choice.
- Proceed with the 3D Bioprinting protocol as usual.
CONCLUSIONS
The process of generating spheroids can be achieved with several techniques, and the use of those spheroids is wide. For 3D Bioprinting with the REG4Life 3D Bioprinter (REGEMAT 3D S.L.), we will check the dimensions and we will select an appropriate nozzle diameter. The spheroids can also be placed manually inside an hydrogel or used for other purposes. By using the hanging-drop technique, we can easily and low-costly generate cellular aggregates. The application of this technique can generate functional constructs that mimic the native tissue and can be used for tissue engineering, organoids generation or drug testing combined with 3D Bioprinting.
| Number | Category | Product | Amount |
|---|