Introduction
The skin is an important protection of the body against the external environment. Its structure formed by the epidermis, dermis and hypodermis, constitutes a fundamental role for its function of physical barrier, thermoregulation, homeostasis and immunity. The importance of these functions is especially evident in the physiological disorders that occur in patients with wounds and burns (Whitaker, et al). The regeneration of epithelial tissue has been one of the main objectives of modern medicine; To date, one of the main alternatives is based on the use of partial thickness grafts of autologous origin. However, the limited availability of this type of graft and its limited capacity to restore the full function of the skin make it necessary to search for new biological substitutes for the skin (Belmonte, et al). The bioprinting of biological components and biomaterials arranged in a structured way using additive manufacturing techniques has great potential when it comes to mimicking the complex structure of the skin. This is due to the three-dimensional spatial control of the different components that can be introduced into the same compound (Wallace, et al).
Materials
- Regemat 3D BioV1 Bioprinter.
- Human epidermal fibroblasts (HDFs).
- Human keratinocytes.
- Petri dishes for cell culture.
- 24-well culture plates.
- 24-transwell inserts.
- 96-well culture plates.
- Collagen type I.
Experimental Procedure
Preparation of Fibroblast Cells for Skin Regeneration:
1. Examine Cell Viability to the Light Microscope. Cells maintained for a short number of passages and to be in high cell density are desired. Confluence = 85%.
2. Aspirate culture medium from the plate.
3. Wash with PBS using appropriate volume for each case. Usually this is about ½ of the volume used to feed the cells.
4. Add enzymatic dissociation medium (trypsin / acutase).
Plate Type Quantity to add per plate:
24 well plate 0.250 ml
12 well plate 0.5 ml
6 well plate 1 ml
10 cm dishes 3 ml
5. Incubate for 10 minutes at 37ºC and 5% CO2.
6. After 10 minutes of incubation, check by microscope that the cells have completely disposed of the culture plate. If cells are still adhered, it is advisable to increase the incubation time.
7. Resuspend cells in dissociation medium gently using a p1000 pipet. Take care not to produce bubbles due to the possibility of decreasing cell viability.
8. Transfer cells to a 15ml conical tube.
9. Neutralize the dissociation medium, adding regular culture medium to the conical tube in a 1: 1 ratio.
10. Centrifuge the cells for 5 ‘at 200g-1500rpm.
11. Aspirate medium being careful not to scratch or remove the cell pellet adhering to the conical tube.
12. Resuspend pellet in 10ml of 1M DMEM HEPES cell culture medium + 10% FBS + 1% Pen / Strip.
13. Take aliquot of 10ul and mix with 10ul of Trypan Blue. Resuspend homogeneously and transfer to the Neubauer Chamber.
14. Proceed with the cell count applying the formula: No. of cells counted * Dilution factor applied (1: 2) * 104.
15. Take the volume necessary to obtain 8 * 105 million cells / mL.
Preparation of Collagen-based Hydrogel for skin tissue engineering:
1. Prepare stock solution of collagen type I at 9.6 mg / ml. Adjust final volume of hydrogel diluted with Phosphate Buffer Saline (PBS).
2. Homogenize hydrogel by vortexing or centrifugation at 200g for 5 minutes.
3. Calculate the amount of collagen needed to obtain 3ml to 8mg / ml solution from stock solution. Required volume = 2.7ml.
4. Proceed with gelation to initiate ionic cross-linking of the hydrogel. by adding 62ul NaOH.
5. Add dermal regeneration medium DMEM HEPES 500ul.
6. Incubate biotin on ice for 5 minutes
7. If bioprinting with cells directly, add 90% volume first and then the remaining 10% with cells after the incubation period.
Bioprinting of skin based on Collagen and Fibroblasts:
1. Add 10% cell volume to the gelled bioink.
2. Resuspend carefully, so as not to form too many bubbles, 10 times with a 1000ul pipette and cut tip.
3. Transfer bioink from the conical tube to print cartridge.
4. Fill the cartridge with the largest possible volume in order to avoid the presence of an air phase inside the cartridge.
5. Install the cartridge in the bioprinter in tool TO.
6. Configure cylindrical figure with the bioprinter software with the following parameters:
to. Cube .stl archive.
b. Diameter 15 mm.
c. Length: 60mm.
d. Height 4mm.
and. Layer height: 0.45mm.
F. Pore width: 0.6mm.
g. Perimeters: 1.
h. Flow velocity: 3.2 mm / s.
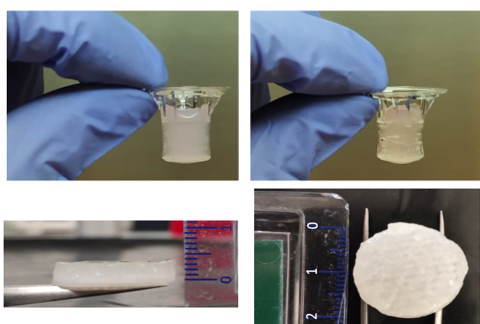
The generated construct has to be incubated at 37ºC and 5% CO2 in measured DMEM HEPES for 14 days to obtain a mature graft. Proceed at medium change every 2-3 days.
| Number | Category | Product | Amount |
|---|---|---|---|
| 1 | Biomaterials | PLA standard-100 gram | 1 |
| 2 | - | Collagen Type I | 1 |
| 3 | - | PBS | 1 |
| 4 | - | DEMEM HEPES | 1 |
| 5 | - | Human Fibroblasts | 1 |
| 6 | - | Human Keratinocytes | 1 |